The navigate command lets you explore the digital sky through a celestial sphere map (showing the constellations and their boundaries), by entering specific coordinates, or by selecting a specific position angle.
To access the Navigate command, select Orientation > Navigate. Three tabs at the top of the window indicate the navigator choices: Celestial Sphere, Sky Chart Center, and Rotation.
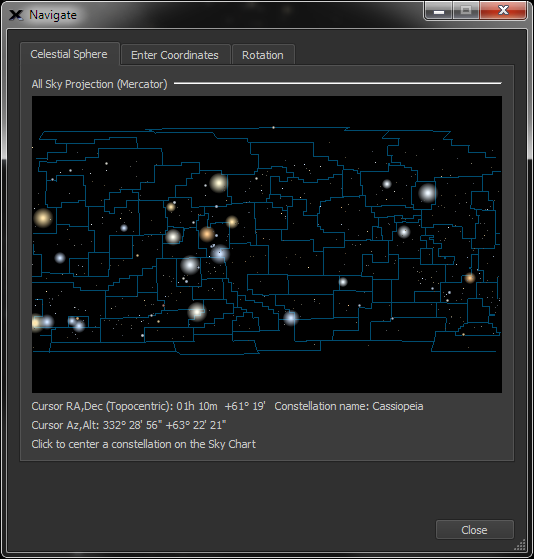
Figure 17: The Celestial Sphere tab on the Navigate window.
The Celestial Sphere tool shows a view of the entire sky with constellation boundaries. The RA/Dec of the mouse pointer, and constellation name are updated in the status text. Click the mouse on the graphic to center the Sky Chart on this constellation.
If the chart looks too small at first, simply click and drag the window’s lower right corner to resize it. After you close the window or quit the application, TheSky will remember the window size and position each time you open it.
By default, TheSky attempts to pin the local horizon near the bottom of the screen. If the “clicked on” position happens to be below the horizon, the Sky Chart moves to the closest visible point. Turn on the Allow Sky Chart to be Scrolled Below the Horizon option on the Horizon tab on the Display > Horizon & Atmosphere Options window to allow regions below the local horizon to be accessible.
To move a region of the sky to the center of the window, click and drag the map. Because it represents a sphere, the map is a continuous loop.
You can remove the horizon picture from the Sky Chart altogether by deselecting the Show Horizon checkbox. Click Close on the Navigate window to return to the Sky Chart. You will notice that you can now scroll below the horizon either manually or with the Celestial Sphere navigator.
When finished with the Navigate window, click Close to return to the Sky Chart.
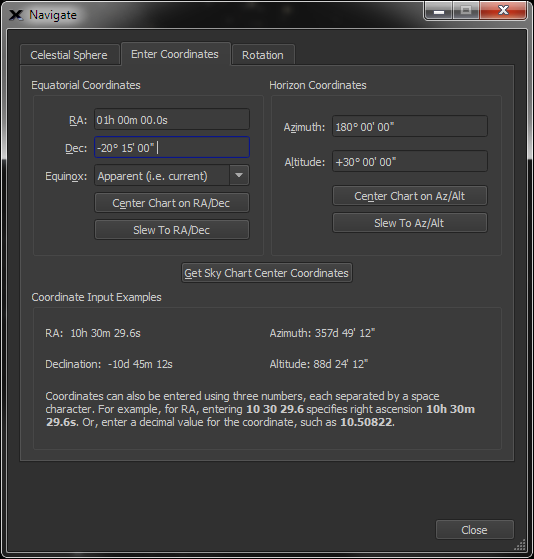
Figure 18: The Enter Coordinates tab on the Navigate window.
Select the Enter Coordinates tab to enter specific coordinates in either equatorial (RA/Dec) or horizon coordinate (Az/Alt) systems.
To enter coordinates, click on the desired field and directly enter the values into it. For convenience, you can simply enter three numbers separated by spaces. For example, enter 10, 30, 29 into the RA field to specify right ascension of 10h 30m 29s.
Because equatorial coordinate systems are based upon the orientation of Earth’s axis, their accuracy diminishes over time due to, among other factors, precession. For that reason, many publications reference equatorial coordinates at a specific point in time known as an equinox. If you are using RA/Dec coordinates, it is important to choose the correct equinox (either 2000.0 or 1950.0). The 1950.0 equinox setting can be useful, as many older publications list equatorial coordinates per the 1950.0 equinox.
Click Center on RA/Dec (for equatorial coordinates) or Center on Az/Alt (for horizon coordinates) to center the Sky Chart on the selected coordinates.
When connected to a telescope, click Slew To RA/Dec to slew the telescope to these equatorial coordinates, or click Slew to Az/Alt to slew the telescope to these horizon coordinates.
Click the Get Sky Chart Center Coordinates button to display the current coordinates of the Sky Chart’s center in the above coordinate fields.
For your reference, example input for each of the coordinate systems appears in the Coordinate Input Examples near the bottom of the window.
Click Close to return to the Sky Chart.
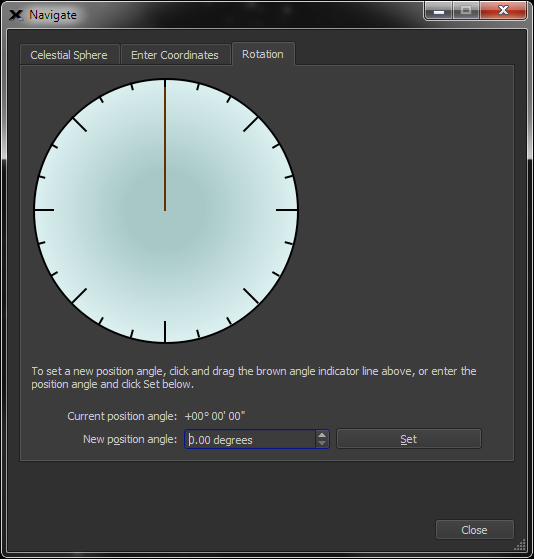
Figure 19: The Rotation tab on the Navigate window.
The Sky Chart can be rotated to any angle, called the position angle, and it helps to match the Sky Chart to the actual sky and to paper charts you may use while observing or planning an observation session.
Click the Rotation tab to view and adjust the Sky Chart’s position angle. You will immediately see a graduated circle with a brown indicator showing the Sky Chart’s current position angle. Click and drag this indicator to adjust the position angle to whatever you wish in real-time.
Near the bottom of the window, you will see the Sky Chart’s Current Position Angle. You can also enter a New Position Angle into the field at the bottom of the window (to hundredths of a degree of accuracy). Use the up and down arrows here for an easy way to adjust the position angle in whole-degree increments. For example, if you enter 42.78°, clicking the up arrow once will increase the value to 43.78°.
Once you have entered a position angle, click Set to update the Sky Chart.
Click Close to return to the Sky Chart.
The horizon is hidden automatically when you adjust the position angle. Changing the position angle is equivalent to changing the direction of “down” in relation to the horizon, so the horizon as a reference becomes irrelevant. TheSky removes it to avoid confusion.

Refractors and catadioptric telescopes used with star diagonals produce mirror images of the sky because they have an odd number of image reflections. Selecting Display >Show Mirror Image flips the Sky Chart to “reflect” the view through a refractor or catadioptric telescope with star diagonal.
|
|
· The mirror image icon appears in the upper left corner of the Sky Chart when Show Mirror Image is turned on.
· When your optical system produces mirrored photos, and one of these photos is used to perform a successful Image Link (page 322), Show Mirror Image is turned on automatically. |
