Figure 280: The Cameras+ Module window.
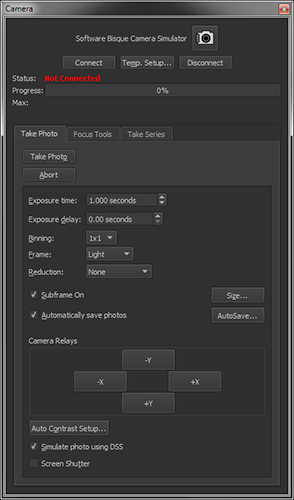
Once the camera is selected and communication established, take a photo using the default settings by clicking the Take Photo button on the Camera window.
When the exposure is complete, the photo is downloaded from the camera and displayed in the “FITS Viewer Window” (page 110).
Click the Connect button to establish a communication link between the camera and TheSky. The Ready status text indicates the camera is ready to acquire photos.
Click this button to specify the cooling point for the camera.
Click the Disconnect button to end communication with camera. This step is usually performed at the end of the imaging session. The status text will show Not Connected.
Click this button to take a photo with the selected camera using the current camera settings.
Click this button to immediately end the process of acquiring a photograph from the camera.
The maximum exposure length is determined by how good your polar alignment is, and by how accurately your mount tracks. If you see stars trailing into lines, shorten your exposure until this goes away (or take some time to improve your polar alignment or the accuracy of your mount’s tracking). If you see wiggly lines on long exposures, then your mount's tracking error is too large for the current focal length. Use a focal reducer, or switch to a scope with a shorter focal length that better fits the capabilities of your mount.
The following table includes some recommended exposure times for various objects. The table assumes a focal ratio in the range of about f/7. Use longer exposures for longer focal ratios, and shorter exposures for shorter focal ratios. If you get blooming on a particular object, then go to a shorter exposure. If you don't get much detail in the image, or it seems washed out, go to a longer exposure. Generally speaking, unless you run into blooming, saturation, or other problems, longer exposures are generally better. Experiment to find the best exposures for your setup. You might want to keep a written record of successful exposures, which you can use as a guide for future imaging sessions.
|
Object |
Suggested Exposure Range |
|
Sun |
Use a visual solar filter, plus any additional filters needed to cut the light. Polarizing filters, moon filters, or other specialized filters such as h-alpha filters can reduce the light so that your camera's shortest exposure will be sufficient for solar images. Do not use so-called photographic solar filters. These are intended for film, which is much less sensitive than your CCD detector.
Never attempt to photograph or view the sun without a proper solar filter!
|
|
Bright planets |
Planets such as Venus, Jupiter, Saturn, and Mars require surprisingly short exposures with most setups, as little as 5 to 10 thousandths of a second. However, if you use a Barlow or eyepiece projection to increase the focal ratio to f/20 or even f/30, longer exposures (up to a full second) may be required.
|
|
Moon |
The moon is also very bright, especially around full moon, and may require some effort on your part to attenuate the light sufficiently for imaging. Polarizing filters and moon filters, or both, will get the job done. As with solar images, the shortest possible exposure of your camera should be tried first. Then add additional filtering if that isn't short enough or increase the exposure if it's not long enough.
|
|
Open clusters, bright globular clusters |
These objects require relatively short exposures, and exposure length is usually limited by blooming if you don’t have an anti-blooming camera. If you do have an anti-blooming camera, you can even image open clusters long enough to image background galaxies. For clusters with very bright members, or globular clusters with very bright cores such as M13, exposures under a minute should be enough. Dimmer clusters may require exposures longer than a minute. Very bright clusters, such as the Pleiades, may only work well with anti-blooming cameras. For color imaging, be careful not to saturate bright stars so you can get truer star colors.
|
|
Galaxies |
Galaxies come in a enormous range of brightness levels. M31 will show up in an exposure of a few seconds; M101 may require 5 to 10 minutes or more. Edge-on spirals and elliptical galaxies are brighter and require shorter exposures. Face-on spirals are usually the dimmest galaxies and require longer exposures. When using a scope with a very long focal length, large pixels or binning may be required to get reasonable exposure times.
|
|
Nebulas |
Nebulas come in an even wider range of brightness than galaxies do. Some, like M42, will yield excellent results in less than 20 seconds. Others, like the Rosette Nebula, may require 20-minute exposures to get good detail. A few trial exposures will help you determine the best exposure for any given nebula.
|
Longer exposures are better in most cases because they provide better-quality data. However, blooming, the risk of passing satellites or airplanes, and other factors usually limit the longest exposure time you can use. You can take multiple exposures and combine them in various ways to increase the quality of your photos.
Enter the number of seconds to wait before taking the next photo. This delay useful to allow the telescope to settle, or to make sure everything is in order before taking a long exposure.
Binning is an on-camera process that effectively combines the signal from a group of adjacent pixels into a single pixel on the photo to increase the sensitivity but decreases the photo’s image scale. Binning pixels allows you to match pixel size to telescope focal length. Pixels that are small require longer exposures and provide higher resolution. Large pixels allow shorter exposures but provide lower resolution. For any given combination of camera and telescope, one bin mode or another will provide the optimal compromise between exposure duration and resolution.
Figure 281 shows how binning works. Binning 2x2 groups four pixels together, giving you virtual pixels that are made up of 4 actual pixels. Binning 3x3 yields virtual pixels made up of nine actual pixels.
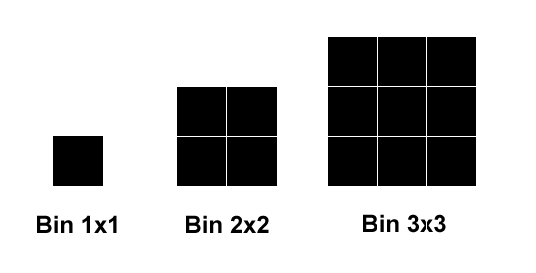
Figure 281: Bin modes group pixels together for greater sensitivity, at a cost of lower resolution.
Figure 282 shows the relative sizes of image taken with 1x1 binning (larger image) and 2x2 binning (smaller image). Both images cover the same area of sky, about 1 by 1.5 degrees in this example. The 2x2-binned image shows that the binned detector is more sensitive because there is more detail visible in the dim areas of M42. It also shows that the binned pixels bloom less quickly – four pixels can hold more energy than one before they spill over into adjoining pixels.
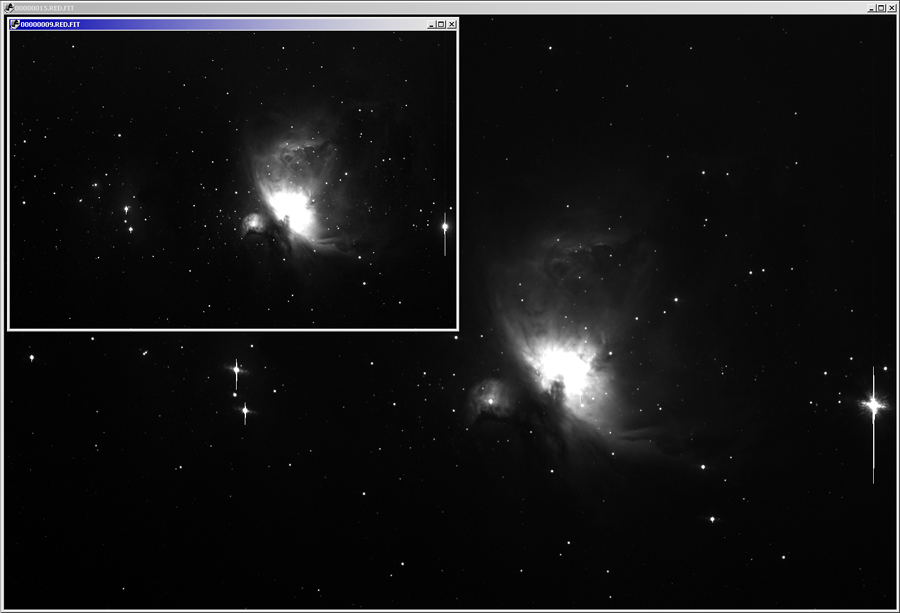
Figure 282: Relative sizes of a 1x1- and 2x2-binned image.
You will most often use a bin mode that will delivers between 2 and 4 arcseconds per pixel. This is the most common range for general-purpose CCD imaging. When working in this range, each pixel in the image “sees” or covers 2 to 4 arcseconds of the sky. The seeing conditions on most nights allow approximately 2 to 4 arcseconds of detail, and that is the reason for this range of values. If you have better or worse seeing conditions, select a bin mode based on your local conditions.
High-resolution imaging provides fewer than 2 arc-seconds per pixel and can only be done on nights when the seeing is exceptionally good. This type of imaging is used most often for planets but can also yield very fine detail on galaxies. The key is to wait for exceptional seeing conditions that will support higher resolution.
Low-resolution imaging (more than 4 arc-seconds per pixel) allows you to image wide fields of view and can be done with camera lenses or telescopes with very short focal lengths. Seeing is unlikely to affect low-resolution wide-field images, so you can do this kind of imaging on almost any clear night.
You can use various tools and web pages to determine arcseconds per pixel for your camera and telescope combination, or use the following formula:

If you are binning 2x2, be sure to double the pixel size to get the correct value. For example, if you have an ST-7E camera (9-micron pixels) and are using it unbinned on a Meade LX200 8-inch at f/10, this is:

Or 0.93 arcseconds per pixel. That's very high resolution. Since a typical night offers 2-4 arcsecond seeing conditions, you would rarely be able to use all that resolution. Binning 2x2 yields 18-micron pixels, which gives you 1.86 arc-seconds per pixel. This is just under two arcseconds per pixel and offers a good compromise on nights of typical seeing.
You can also approach this from another direction: using a 50% focal reducer will bring the focal length of this scope down to 1000mm, which provides 1.86 arcseconds per pixel unbinned.
|
|
· Binning also increases the sensitivity of your camera, as shown in Figure 282. Smaller pixel size means higher resolution, while larger pixel size means greater sensitivity.
When you bin 2x2, you are making the pixel size four times larger in area, so the virtual pixel is four times more sensitive to light. You are making a tradeoff between resolution and sensitivity whenever you select a bin mode for your image.
Try an experiment for yourself. Take a one-minute exposure of a galaxy using 1x1, 2x2, and (if available) 3x3. Note the differences in resolution and sensitivity. |
|
|
· The range of available bin modes depends on the camera hardware. While the Cameras+ Module attempts to use information from the camera driver to list only the bin modes that are available for your camera, please consult the camera’s documentation to determine the bin modes that your camera supports.
|
If you are just getting started, make sure that the Frame is set to Light. The Frame pop-up also includes settings for taking photo reduction frames. A CCD detector generates a certain amount of noise, and photo reduction removes a great deal of that noise. When you are taking a photo, always set the frame type to Light.
|
Frame Types |
Description |
|
Light |
A normal photo, taken with the shutter open.
|
|
Bias |
A frame of the shortest possible exposure, taken with the shutter closed. It represents the minimum noise in the CCD detector and camera circuitry. This frame is subtracted from Dark frames so that the dark frames can be scaled for time and temperature differences.
|
|
Dark |
A photo taken with the shutter closed. It is in effect a picture of the electronic noise in the camera. This noise can be subtracted from a Light image to create a cleaner image.
|
|
Flat Field |
A flat field is an image taken of an evenly illuminated field, with the shutter open. Think of the flat field as a photograph of the optical noise in the system, such as dust motes on glass surfaces or reflections off of the inside of the telescope. The Flat Field is applied to the Light frame to eliminate this source of noise.
|
When you select Light as the frame type, you can also choose the type of reduction to apply to the photo. Reduction is the process of applying bias, dark, and flat-field frames to your image to reduce system noise.
For your first images, choose the AutoDark reduction setting. After your exposure is finished, the software will automatically take a dark frame with the same exposure settings and subtract it from the photo. This will give you a cleaner image with less thermal noise. When you gain more experience, you can explore the other reduction options:
|
Dark Frame |
Description |
|
None |
The software performs no photo reduction. Use this setting when you wish to manually apply your own bias, dark, and flat-field images; or when you simply want a quick image without any reduction.
|
|
AutoDark |
This follows the first exposure with a single dark frame. The dark frame is saved in memory and will be applied to all subsequent exposures that have the same: · Width · Height · Exposure time · Bin mode as the original photo.
If any of the above parameters changes, a new dark frame is taken and applied to subsequent photos. For computers with more than one processor, see “AutoDark Subtract Uses All Processors” on page 561 to speed this process.
|
|
Full Calibration |
Photos are calibrated using a master frame from the selected calibration Group.
|
|
Group |
The Group pop-up appears when Full Calibration is selected from the Reduction pop-up and is hidden otherwise. Choose the name of the image calibration group to apply to each photo.
|
|
Image Calibration Library |
Click this button to open the Image Calibration Library window. The controls on this window can be used to define calibration groups and create master frames (page 668). |
Turn on this checkbox to acquire a photo using only a portion of the detector, rather than the full frame. This can be useful, for example, to speed the photo download process when focusing on a star.
Click this button to shows the Subframe window and define the position and of the subframe rectangle on the photo.
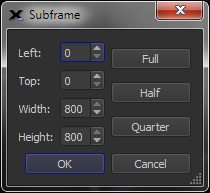
Figure 283: The Subframe window.
Enter values to define the top and left position of the subframe rectangle on the photo.
Enter values to define the width and height of the subframe rectangle on the photo.
Click this button to reset the dimensions of the subframe to match the size of the entire photo.
Click this button to define a subframe that covers the top half of the photo.
Click this button to define a subframe that covers the top, left quarter of the photo.
Turn on the Automatically Save Photos checkbox to automatically save each acquired photo to the computer’s drive.
On the Imaging System Setup window, highlight Camera in the Hardware list, then click the AutoSave Setup button to configure how photos are saved. The most common choice is to automatically save all photos. You can even save focusing photos if you so want. Photos from both the imager and autoguider can be saved automatically.
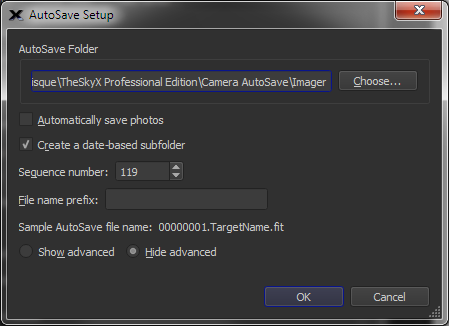
Figure 284: The AutoSave Setup window with the advanced settings hidden.
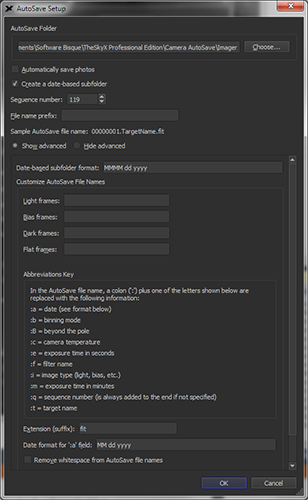
Figure 285: The AutoSave Setup window showing the advanced settings.
This text box shows the current folder where photos are saved. The default location is the AutoSave folder in the Application Support Files folder (page 28). Click the Choose button to select a different folder.
Turn the checkbox on to save all photos.
Each time a photo is saved using AutoSave, this Sequence Number is incremented by 1. If you want to have a unique number for every photo, leave this value unchanged. Or, you can reset the sequence number back to 1 every observing session or every series of photos.
Use this text box to define the text that will appear at the beginning of each file name.
This text box shows what an automatically saved file name will look like based on the current settings.
File names for light, bias, dark and flat frames can be customized individually by turning on the Show Advanced radio button and defining the frame-specific file name “keys”. Each key defines specific information that is used to construct a unique file name.
Autosave automatically creates a new folder for each observing session and uses the current date for the folder name. The text that appears in this text box defines the format and position of the month, day and year for the folder name.
For example, for photos created and automatically saved on January 1, 2030, the default text MMM dd yyyy will save files to the folder named Jan 01 2030. See “Date & Time Format Configuration” on page 231 for date formatting options or hold the mouse cursor over this control to show a tool tip with this information.
For each frame type, enter a set of “abbreviations” to define the file name.
|
Abbreviation |
Explanation |
|
:a |
Enter the colon character followed by a lower-case letter “a” to insert the date when the photo is acquired. For example, the text 01 31 2012 is inserted in the file name for photos acquired on January 31, 2012.
See “Date & Time Format Configuration” on page 231 for details how to format the date and time.
|
|
:b |
Enter the colon character followed by a lower-case letter “b” to insert text that defines the bin mode (1x1, 2x2, 3x3) used to acquire the photo.
|
|
:B |
Enter the colon character followed by an upper-case letter “B” to insert text that defines the orientation of a German equatorial mount when the photo is acquired.
The “beyond the pole” (Btp) convention is used to define the position of the optical tube assembly end of the declination axis with respect to the celestial pole.
NoBtp: The mount’s current orientation is not beyond the pole. Btp: The mount’s orientation is beyond the pole.
|
|
:c |
Enter the colon character followed by a lower-case letter “c” to insert the current temperature sensor. For example, –5.02C.
|
|
:e |
Enter the colon character followed by a lower-case letter “e” to insert the exposure time, in seconds. For example, 61.05secs.
|
|
:f |
Enter the colon character followed by a lower-case letter “f” to insert the filter name used to acquire the photo. For example, Green.
|
|
:i |
Enter the colon character followed by a lower-case letter “i” to insert frame type. For example, Light.
Options: Light Bias Dark Flat
|
|
:m |
Enter the colon character followed by a lower-case letter “m” to insert the exposure time, in minutes. For example, 1.02mins.
|
|
:q |
Enter the colon character followed by a lower-case letter “q” to insert the current sequence number in the file name.
Note that a sequence number is always included in AutoSave file name. If no :q appears in the custom name, the sequence number appears at the end of file name, before the file name suffix. Otherwise, add a :q at the desired position of the sequence number.
|
|
:t |
Enter the colon character followed by a lower-case letter “t” to insert the name of the target object. For example, Andromeda Galaxy.
|
Enter an extension for the AutoSave file name that appears after the period character in the file name. By default, the three-letter extension fit is used when automatically saving Flexible Image Transport files.
Click the +X/+Y/–X/–Y buttons to make small adjustments to the mount’s position using the current autoguide method.
· Camera Relays: the camera’s guider relays are activated which pulls to ground the appropriate lead(s) through a guider cable to the mount’s guider port to move the telescope.
· Direct Guide: the mount’s position is adjusted directly through the mount’s control system (Paramount and Bisque TCS-controlled mounts, only).
· PulseGuide: the telescope is move by sending “small” telescope move commands directly to the telescope’s control system (non-Paramount mounts).
Turn on the Simulate Photo Using DSS checkbox to take photos of Digitized Sky Survey objects, instead of collecting “actual” photons with the camera’s detector and a telescope. See “Creating a DSS Photo” on page 108 for more information about configuring TheSky Pro to retrieve photos from the Digitized Sky Survey.
You can control where in the sky the simulated camera is pointing by selecting a new target in the Find window (page 72), or connecting to a simulated (or actual) telescope, and then slewing the telescope to the target (page 403)
To take a photo, click the Camera tab, enter the Exposure Length, Binning and click Take Photo button.
When the photo is ready, it is displayed in the FITS Image Viewer window (page 110).
